
Chicken Bacon Caesar Wrap - Wrap up your chicken caesar salad with bacon to go! Take it for lunch or meal prep it for an easy dinner throughout the week. It’s easily customizable so everyone can make theirs how they like it!
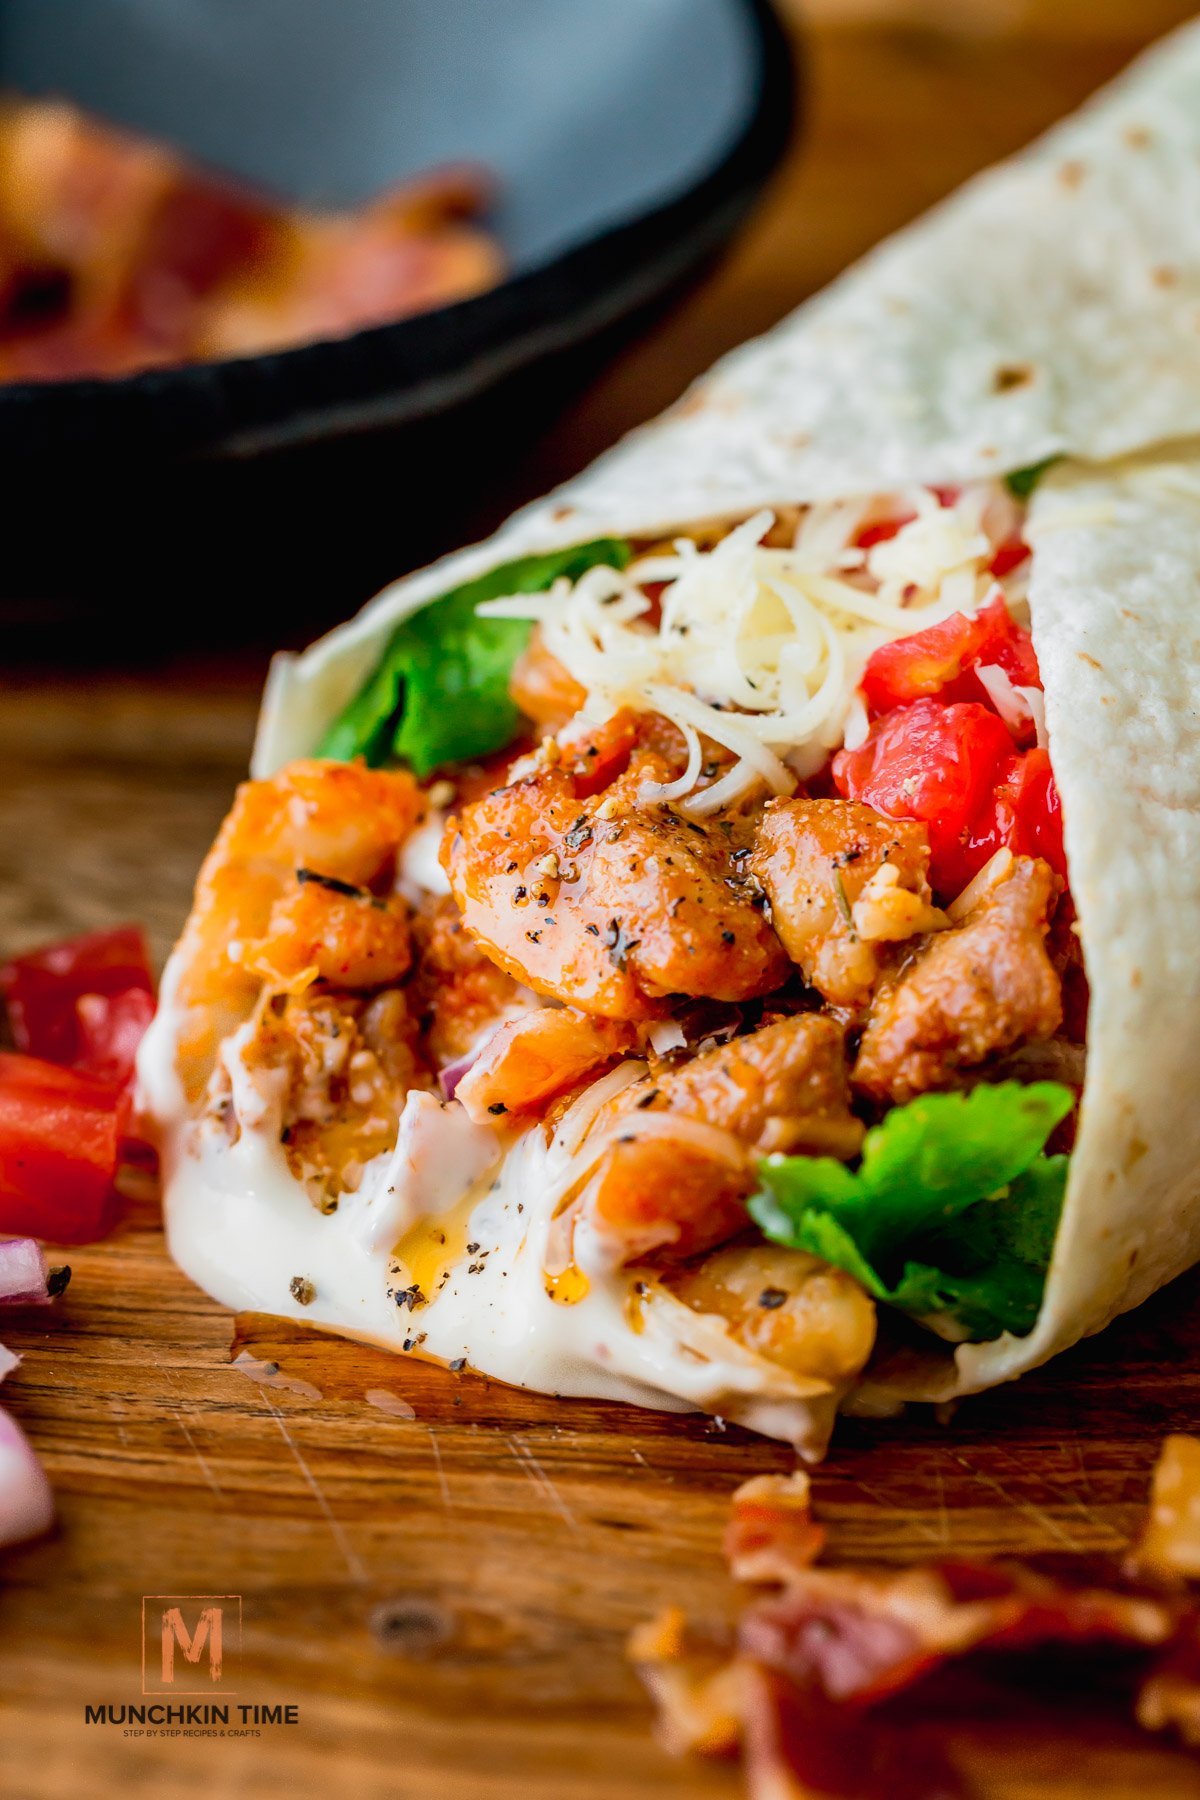
This chicken bacon caesar wrap has everything you love about a classic caesar salad wrapped in a flour tortilla! It's the perfect light lunch or easy dinner idea, and a great way to eat a salad on the go.
Made with seasoned grilled chicken, crisp lettuce, bacon, onions, and your favorite dressing, it's an easy way to pack a fresh, yet hearty meal into your day. The bonus is, you can meal prep the chicken and bacon to get a head start for the next day!
Jump to:
Why You’ll Love This Recipe
- Quick and easy. Perfect for busy weeknights and easy lunches.
- Customizable. There are plenty of ways to make it your own!
- Meal prep. Cook the chicken and bacon, wash and dry your lettuce, slice your onions, etc.
- Portable. Pack it up for school lunches, bring it to work, or have it for a picnic.
Ingredients Needed

- Chicken thighs: I use boneless skinless chicken thighs, trimmed of any excess fat. If you prefer to use boneless skinless chicken breasts, you can.
- Seasoning: Garlic granules, onion powder, paprika, Italian seasoning, salt and pepper.
- Avocado oil: Used to cook the chicken.
- Cooked bacon: Crispy chopped bacon adds wonderful salty bites!
- Large flour tortillas: I use the large size to hold all the filling or you can use cottage cheese flatbread.
- Lettuce: Wash, dry, and chop your lettuce. Romaine is generally used for Caesar salad, but you can use your favorite greens.
- Medium tomato: Dice your tomato, or use cherry tomatoes and cut them in half.
- Red onion: Thinly sliced, these add a nice crunch. I have a great pickled red onion recipe that might be fun to try!
- Shredded cheddar cheese: I love cheddar, especially freshly grated cheddar, but you could swap it for Parmesan cheese if preferred.
- Caesar dressing: Plus more for serving
See the recipe card for the full information on recipe ingredients and quantities.
How to Make an Easy Chicken Caesar Wrap


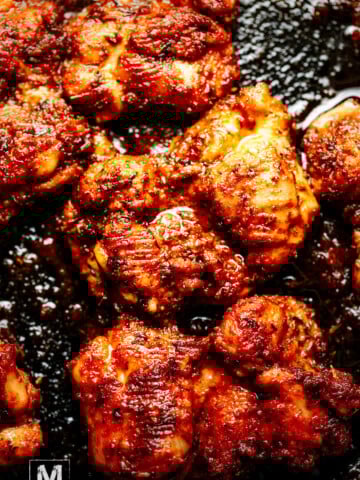
Step 1: Use a sharp knife to slice your chicken into pieces. Toss with the combined seasoning and set that aside.


Step 2: Heat oil in a skillet over medium-high heat. Add the chicken to the pan and cook all the way through. Set that aside as well.


Step 3: Cook the bacon in a skillet or the oven at 400°F for 10-12 minutes until crispy. Drain on paper towels and once cooled, chop the slices into crumbles.


Step 4: Lay your warm tortillas flat. Add the lettuce, chicken, bacon, cheddar cheese, tomatoes, and red onion slices to the middle. Drizzle with Caesar dressing.


Step 5: Fold in the sides of the wrap towards the middle, then use the bottom flap to roll it up tightly. Enjoy with even more dressing!

Serve it with creamy tomato bisque, roasted butternut squash soup, or dill pickle potato salad if you’re looking for a tasty side dish to pair with it.
Cooking Tips
- Make sure to dry your lettuce well! Any water on the surface will make it soggy.
- Cook the chicken fully. It should have an internal temperature of 165°F for it to be ready to eat.
- Cook bacon in the oven. I prefer doing it this way for less splatter and even cooking.
- Warm tortillas. Stack them on a plate and microwave for 10-20 seconds.
Variations & Substitions
- You can cook the chicken thighs whole first and slice them once they’re cooked. Slicing them first does allow for more surface for the seasoning though!
- Instead of layering the filling, you could toss the salad together first with the dressing and then add scoops of salad into the wrap.
- Omit the bacon to keep it vegetarian.
- You can also remove the tomatoes if you don’t want them. Or replace them with crunchy croutons made from homemade sourdough bread.
- Use Romaine lettuce, Iceberg lettuce, baby spinach, kale, etc.
- Try it with a whole wheat tortilla, spinach tortilla, or a gluten free tortilla.
- Get creative with the chicken. Use diced crispy chicken tenders or buffalo chicken instead. You can also use store bought rotisserie chicken to save some time.
- Swap the chicken for lemon garlic shrimp and make it a shrimp caesar wrap instead!
What to Serve with Chicken Caesar Wraps
Looking for the perfect sides? Try these easy pairings:
- Air Fryer crispy fries or sweet potato wedges
- Fresh fruit salad
- Roasted veggies like broccoli or carrots
- Soup and wrap combo (tomato bisque or creamy potato soup)
- Chips and pickles for a quick side
Recipe FAQs
Chicken wrap meal prep is easy! Cook the chicken ahead of time, cook the bacon ahead of time, wash, dry, and chop the lettuce, slice the onions, and shred the cheddar cheese.
Store everything separately in the fridge overnight and combine in the wrap just before serving.
It’s important to dry your lettuce! Then use it as a barrier between the wrap and the rest of the chicken bacon caesar. You also want to ensure you’re not using too much dressing.
You can store leftovers in the fridge for up to 1 day. Anything longer than that and it’ll become too soggy.
More Easy Wraps/Sandwiches You’ll Love
- Tomato Bacon Egg Sandwich
- Best Crunchwrap Supreme
- Grilled Chicken Pita
- Shrimp Lettuce Wraps
- Juicy Beef Sliders with Sausage & Cheese
Did you try this recipe? Please leave us a ⭐ review below!
Thank YOU for YOUR Comment, Share & Recipe Review!
When YOU make this Easy Chicken Caesar Wrap Recipe tag us @munchkintimeblog on Instagram, and follow along on Pinterest, Facebook, Tik Tok and YouTube! Thank you for visiting!!!
📖 Recipe

Chicken Caesar Wraps with Bacon (Easy 30-Minute Recipe)
Ingredients
For the Chicken
- 6 chicken thighs skinless, boneless and cut into 1 inch pieces
- 1 teaspoon garlic powder or to taste
- 1 teaspoon onion powder or to taste
- 1 teaspoon paprika or to taste
- ½ teaspoon Italian seasoning or to taste
- salt and pepper to taste
- 2 tablespoons avocado oil
For the Wrap
- 8 slices bacon baked at 400F for 10 min or until crispy, chopped
- 3 large flour tortillas or use high protein cottage cheese flatbread
- lettuce washed
- 1 medium tomato diced or ½ cup cherry tomatoes
- ½ small red onion thinly sliced or diced
- 1 cup cheddar cheese shredded
- ½ cup Caesar dressing
Instructions
- Prepare the Chicken: Slice the chicken thighs into 1-inch pieces. Season generously with garlic powder, onion powder, smoked paprika, Italian seasoning, salt, and black pepper.
- Cook the Chicken: Heat avocado oil in a large skillet over medium-high heat. Add the seasoned chicken and cook for 6–8 minutes, stirring occasionally, until the pieces are golden brown and fully cooked through (internal temperature should reach 165°F). Remove from the heat and let cool slightly.
- Cook the Bacon: While the chicken is cooking, prepare the bacon. You can either: Fry it in a skillet over medium heat until crispy, or bake it in the oven on a parchment-lined baking sheet at 400°F for 10–12 minutes. Place onto a paper towel and chop into bite-sized pieces.
- Warm the Tortillas: Heat tortillas in a dry skillet for 20–30 seconds per side, or wrap them in foil and warm in the oven for a few minutes. Warm tortillas roll more easily and won’t tear.
- Assemble the Wraps: Lay each tortilla flat. Add a layer of chopped lettuce, followed by the cooked chicken, crispy bacon, shredded cheddar cheese, diced tomatoes, and finely diced red onion. Drizzle with creamy Caesar dressing.
- Roll and Serve: Fold in the sides of the tortilla and roll tightly from the bottom up, just like a burrito. Slice in half and serve with extra Caesar dressing on the side for dipping.
Video
Notes
- Meal Prep Friendly: Cook the chicken and bacon ahead of time and store them in an airtight container in the fridge for up to 3 days. Assemble wraps fresh for the best texture.
- Make It Healthier: Swap regular tortillas for whole wheat or low-carb wraps. You can also use Greek yogurt–based Caesar dressing for a lighter option.
- Crispy Bacon Hack: Baking bacon in the oven is less messy and gives you perfectly crispy strips every time.
- Prevent Soggy Wraps: Pat lettuce dry before adding it. If you’re making wraps ahead of time, keep the dressing on the side until ready to eat.


Leave a Reply